Make your Windows laptop work as a Wi-Fi access point
When you travel, you encounter all kinds of Internet access arrangements. Some hotels make it easy, allowing you to use their Wi-Fi networks without restrictions. More often than not, however, connecting to Wi-Fi on the go is not simple. For example, some hotels limit connections to their Wi-Fi networks to one device only. Or, one device at a time. Or, some places offer the wired (Ethernet) lines only. Sure, you can connect your laptop to the Internet this way, but what about your tablet or the smart phone, wouldn't it be nice to connect them, too?
Turns out, it may be possible to set up your laptop to share its Internet connection with other devices via its built-in Wi-Fi device. The following steps should work well if you have a laptop with Windows 7 or later. If you have Windows Vista or XP, a different procedure may work instead. (A hint: search the web for how to create an ad-hoc connection for the specific version of Windows that you have.)
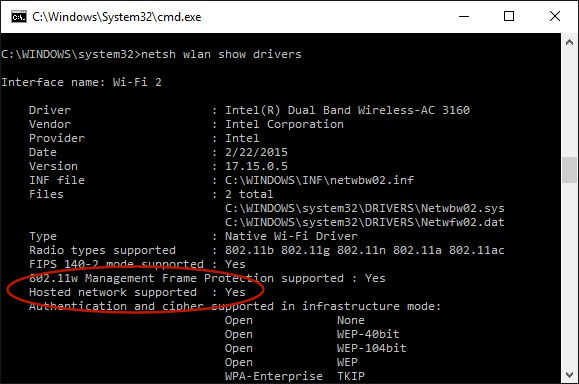
The first thing to do is to check that your Wi-Fi network adapter supports the so called Hosted Network mode. To do that, open Windows command prompt and enter the following command:
netsh wlan show drivers
Look for the line that reads Hosted network supported: Yes.

Don't worry, you don't need to know what hosted network is, all you need to do is find that line. If you see it, you are good to go. If not, then your Wi-Fi network adapter does not support this feature, sorry.
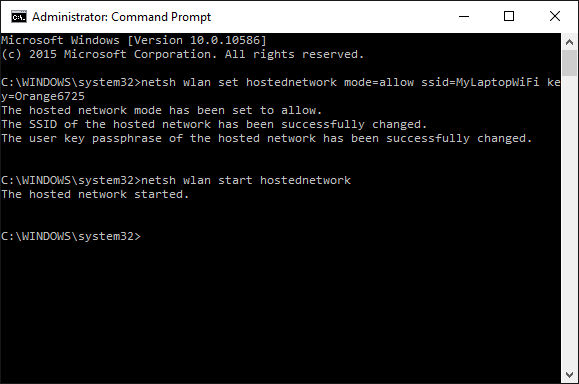
Now, let's configure your laptop to offer its own Wi-Fi access point, to which you could connect your other Wi-Fi devices. First, decide on the name of the wireless network your laptop would create. It could be nearly anything. In the example below, we chose the name MyLaptopWiFi. Second, decide on the password that you would need to enter to connect your other devices to this access point. We chose Orange6725 as the password; you can obviously choose something else.
To actually create the access point, open the command prompt in the Administrator mode. To do that on Windows 10, you could press the Win-X keys and select Command prompt (Admin) from the menu. Then, enter the following two commands into the command prompt:
netsh wlan set hostednetwork mode=allow ssid=MyLaptopWiFi key=Orange6725

netsh wlan start hostednetwork
Of course, replace MyLaptopWiFi and Orange6725 with your own name and password that you have chosen.

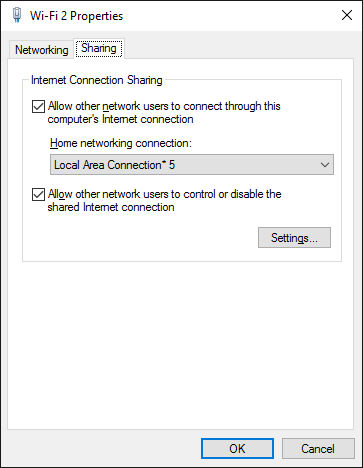
This creates the access point, but it's not fully operational yet: you need to tell Windows that you want to share your actual Internet connection with the access point you've just created. To do that, use Windows Control Panel to open the Network and Sharing Center window. There, click on the connection that provides the actual connection to the Internet (which could be your Wi-Fi connection or the Ethernet line, depending how you have connected to the Internet.), press Properties for that connection, and finally select the Sharing tab:

Check the Allow other users to connect through this computer's Internet connection box, and also select Local area connection in the Home networking connection list.
This should make your laptop to work as a Wi-Fi access point. If you open another device, you should now see MyLaptopWiFi in the list of the Wi-Fi networks offered. Connect to it, as usual, entering the password you have set up, and your device should now be connected to the Internet via the laptop. Pretty neat, huh?
Well, it all should work well in theory. In practice, though, we discovered that not all is smooth. If you connected a device to MyLaptopWiFi, but there is no connection to the Internet on that device, try to restart the laptop, and repeat the steps above again, it may work better the second time. Or, it appears that enabling the access point may not work well with the power transitions of your laptop. That is, if you try to put the laptop to sleep, it may not work and the laptop may stay awake while the access point is enabled. We also experienced a few blue screen crashes, although not that frequently to make it a real concern. It may depend on the model of your laptop or the Wi-Fi card that your laptop has; some combinations may work better than others.
Keep in mind, that if you put your laptop to sleep or restart it, the access point disappears and you would need to set it up again each time you wake up the laptop. If you do this frequently and don't want to go through the same steps every time, you may want to use Windows Task Scheduler to do it for you. For example, put the two commands shown above in a batch file, and then create a new task that would run that batch file, and set the trigger for that task On workstation unlock. This way, every time you wake up the laptop and unlock it, the batch file would run for you automatically. When you no longer need it, disable the task in Task Scheduler.
We also found that sometimes an attempt to create the access point fails with Windows displaying the following message:
The hosted network couldn't be started. The group or resource is not in the correct state to perform the requested operation.
![]() Password-protect and hide personal files and folders with Folder Guard for Windows 11,10,8,7.
Password-protect and hide personal files and folders with Folder Guard for Windows 11,10,8,7.
User rating: ![]() 4.7 / 5
4.7 / 5
Purchase
or
download a free trial.
Read more...
If this happens, it could be because the hosted network adapter got disabled for some reason. To solve this problem, open Device Manager, navigate to Network adapters, right-click Microsoft Hosted Network device, and choose to enable it. (If you don't see it in Device Manager, restart the laptop.) Check also that the real Internet connection is still shared.
Finally, what if you've created the access point, used it for a while, and no longer need it, - how to turn it off? Easy: open Windows command prompt and enter the following commands:
netsh wlan stop hostednetwork

netsh wlan set hostednetwork mode=disallow
Happy travels!
If you want to link to this article, you can use this HTML code: <a href="https://www.winability.com/make-your-windows-laptop-work-as-a-wi-fi-access-point/">Make your Windows laptop work as a Wi-Fi access point</a>
Read more
- How to disable Adobe's ability to scan all of your organization's documents for generative AI.
- How to send sensitive files using Password.File app.
- [SOLVED] How to disable Taskbar Thumbnail Preview in Windows 11.
- How to restrict access to Microsoft Store app with Folder Guard.
- Tired of the Your password has expired and must be changed prompts? Here is how to stop them.
- How to move Pictures and other folders to Virtual Encrypted Disk.
- How to disable Fast Startup if you use encryption software.
- How to restore Videos, Pictures, and other folders in This PC in Windows 11.
- How to create a local user account in Windows 11 or Windows 10.
- How to enable or disable test signing mode in Windows.
- Email or SMS text messaging are NOT secure for two-factor authentication.
- Estimate how much you could save on electric bill with ActiveExit software.
- How to delete partition on Windows 11 or Windows 10.
- Forget VeraCrypt password? Here is how to recover it.
- Why do my desktop icons keep moving?
- How to create a private folder in Windows 11 and 10.
- How to restrict access to Windows Settings with Folder Guard.
 Suspending all contact with fascist Russia
- How to keep desktop icons from moving by running Icon Shepherd from command line.
- How to restrict access to Task Manager with Folder Guard.
- Take ownership of your files after access denied due to NTFS permissions.
- How to reprogram or disable CAPS LOCK key.
- Encryptability vs Folder Guard: which one to choose?
- Troubleshooting software removal problems using MSI files.
- Encryptability: Compare Personal and Business Licenses.
- How to add Group Policy and Local Security Policy to Windows 11 and 10 Home edition.
- [SOLVED] File is too large for the destination file system.
- Forget your WI-FI password? Find it in Windows 11 and 10 settings.
- What is FAT32 maximum file size limit?
- How to create a secret folder in Windows 11 and 10.
- How to easily password-protect Windows Linux folders with Folder Guard.
- Force DISKPART to delete EFI system partition in Windows 11 and 10.
- How to make Windows 11 and 10 recognize a cloned hard drive again.
- How to stop Windows 11 and 10 from using thumbnail preview icons for folders.
- How to hide pictures from the Photos app in Windows 11 and 10.
- How to save Windows Spotlight photos to your computer.
- How to move the OneDrive folder to an encrypted drive.
- Windows 10 fails to upgrade? Here is how to fix it.
- How to stop Microsoft Edge from opening PDF files.
- Preventing installations of specific programs with Folder Guard.
- Folder Guard licensing explained.
- Speed up the updates of the network folders.
- Make your Windows laptop work as a Wi-Fi access point.
- How to stop automatic Windows Update in Windows 10 and 11.
- [SOLVED] Windows cannot connect to the printer. Access is denied.
- Migrating encrypted data from TrueCrypt to USBCrypt.
- “The Microsoft account service is unavailable right now. Try again later.”
- Using DiffMerge as the external tool of AB Commander to compare plain text files.
- How to repair the icon cache and/or thumbnail cache in Windows 11 and 10.
- Transferring images between your PC and an Android device: Part 2.
- Transferring images between your PC and an Android device: Part 1.
- Case study: Using SoftDetective to suppress Corel Guide sign-in prompt.
- Using junction points to change the iTunes backup folder location.
- How to tell if my Windows computer is 32- or 64-bit?
- How do I stop Windows from rearranging my desktop icons?
- Organize your photo library with the Rename tool of AB Commander.
- Windows does not offer the NTFS format option? Here is how to bring it back.
- How to encrypt Firefox profile, bookmarks, and cookies.
- Restarting Windows 11, 10, and Windows 8 in the safe mode.
- Integrating AB Commander with Universal Viewer.
- How to delete a protected EFI system partition with Windows 11,10, 8, or 7.
- Using Folder Guard to protect from the social engineering attacks.
- How to erase Windows login password if you forget it.
- How to unhide a folder hidden with Folder Guard.
- How to repair Windows desktop icons with AB Commander.
- Slow network in Windows 7 Virtual PC? Speed it up!
- How to show drive letters first in AB Commander and Windows Explorer.
- What is my IP address?
- Why can’t I copy large files over 4GB to my USB flash drive or SD card?
- Test the strength of your password with USBCrypt.
- How to set up an external text editor for AB Commander.
- How to restrict Internet Explorer from downloading programs from the Internet.
- Personal vs business license for USBCrypt.
- Use Folder Guard to restrict access to Control Panel.
- Compare MySecretFolder and Folder Guard.
- Hide folders and make files invisible with Folder Guard.
- WINEXIT vs ActiveExit: automatically log off users from Windows.
- How to protect folder with password in Windows 11 and 10.
- How to restrict access and lock external drives with Folder Guard.
- How to password-protect Dropbox folder with USBCrypt.
- How to set up Folder Guard to stop downloading from the Internet.
- Is (Wipe the content) the same as (Secure Delete)?
- How to encrypt and protect the system C: drive with USBCrypt.
- Make it easier to return your lost encrypted drive.
- USBCrypt for users of Microsoft Office.
- How to start programs elevated from a batch file.
- How to make elevated programs recognize network drives.
- How to disable or enable hibernation.
- Using names and labels to organize USBCrypt drives.
- How to password-protect a USB flash drive.
- Always have a backup of your important files.
 Stand with Ukraine

