Solved: Windows cannot connect to the printer. Access is denied.
Recently we wanted to print something from an old computer running Windows 2000 (yes, we have all kinds of dinosaurs in our office zoo) to a printer connected to a laptop that was recently upgraded to Windows 10. In the past, all we needed to do was to share the printer on the laptop, and then add it as a network printer on the Windows 2000 computer, and it would work beautifully.
This time, however, when attempting to add the network printer to the Windows 2000 computer, we received the following message: "Windows cannot connect to the printer. Access is denied." We tried to do the usual troubleshooting: checked the security settings of the shared printer, checked the sharing settings, made sure that the file and printer sharing was enabled on the Windows 10 laptop, all was in order, yet the Windows 2000 computer was still denied access to the shared printer.
After restarting both computers a few times and repeating the sharing/connecting steps, but the same error message appeared every time. So we tried something different, and it worked. We decided to share our solution here, hoping it could be of help to someone else:
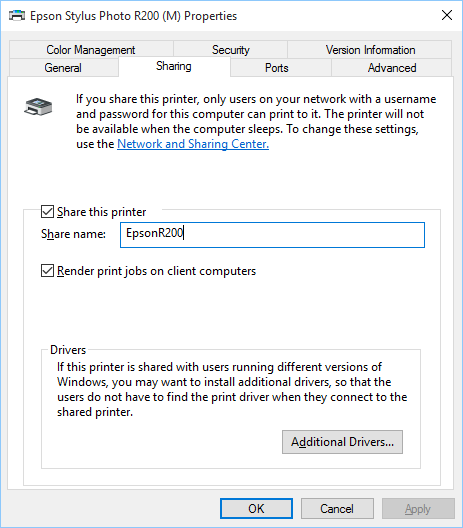
- On the computer to which the printer is connected (in our case it was the Windows 10 laptop), share the printer as usual, and when sharing it, set up the share name that is easy to type in. For example, in our case the long name of the printer was "Epson Stylus Photo R200", but we shared it with the name EpsonR200: (using a simple name like that should make it easier to enter it later on)

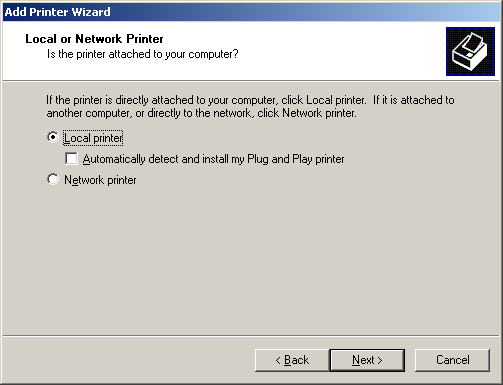
- On the computer from which you want to connect to this printer (in our case it was the Windows 2000 computer) use the built-in Add Printer wizard and choose the 'Add Local Printer' option. (If your computer runs Windows 10, you can find this wizard on the Devices - Printers and Scanners page of the Windows Settings window)

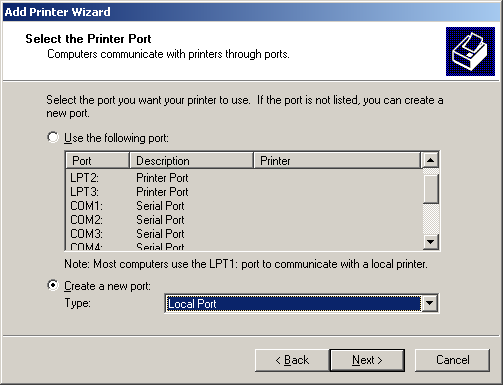
- Press Next, and on the next page choose the 'Create a new port' option and make sure the 'Local port' option is selected:

- When you press Next, Windows will prompt you to enter the port name. Enter the UNC name of the shared printer, in the format: //computername/sharedname . In our case, the computer name of the Windows 10 laptop was laptop, and we had previously set up the shared name of the printer as EpsonR200 (see Step 1 above), so we entered the port name as:

If you don't know the network name of your computer, you can find it out as follows: right-click on the This PC folder (or Computer) in Explorer or some other file manager, and choose Properties from the shortcut menu. On that page, look for the 'computer name' text. That's the name you need to enter instead of 'laptop' in our example. Be sure to use the name of the computer that has the printer attached to it, not the one from which you are trying to connect to the printer through the network!
![]() Password-protect and hide personal files and folders with Folder Guard for Windows 11,10,8,7.
Password-protect and hide personal files and folders with Folder Guard for Windows 11,10,8,7.
User rating: ![]() 4.7 / 5
4.7 / 5
Purchase
or
download a free trial.
Read more...
Next, Windows will probably ask you to select the printer make and model, install its drivers, etc. Keep providing the information that the wizard requires, according to your specific printer. When done, Windows should add the new printer to the computer, and you should be able to use it to print files. The procedure described above worked for us, hopefully it will work for you, too.
Happy printing!
If you want to link to this article, you can use this HTML code: <a href="https://www.winability.com/windows-cannot-connect-to-the-printer-access-is-denied/">Solved: Windows cannot connect to the printer. Access is denied.</a>
Read more
- How to disable Adobe's ability to scan all of your organization's documents for generative AI.
- How to send sensitive files using Password.File app.
- [SOLVED] How to disable Taskbar Thumbnail Preview in Windows 11.
- How to restrict access to Microsoft Store app with Folder Guard.
- Tired of the Your password has expired and must be changed prompts? Here is how to stop them.
- How to move Pictures and other folders to Virtual Encrypted Disk.
- How to disable Fast Startup if you use encryption software.
- How to restore Videos, Pictures, and other folders in This PC in Windows 11.
- How to create a local user account in Windows 11 or Windows 10.
- How to enable or disable test signing mode in Windows.
- Email or SMS text messaging are NOT secure for two-factor authentication.
- Estimate how much you could save on electric bill with ActiveExit software.
- How to delete partition on Windows 11 or Windows 10.
- Forget VeraCrypt password? Here is how to recover it.
- Why do my desktop icons keep moving?
- How to create a private folder in Windows 11 and 10.
- How to restrict access to Windows Settings with Folder Guard.
 Suspending all contact with fascist Russia
- How to keep desktop icons from moving by running Icon Shepherd from command line.
- How to restrict access to Task Manager with Folder Guard.
- Take ownership of your files after access denied due to NTFS permissions.
- How to reprogram or disable CAPS LOCK key.
- Encryptability vs Folder Guard: which one to choose?
- Troubleshooting software removal problems using MSI files.
- Encryptability: Compare Personal and Business Licenses.
- How to add Group Policy and Local Security Policy to Windows 11 and 10 Home edition.
- [SOLVED] File is too large for the destination file system.
- Forget your WI-FI password? Find it in Windows 11 and 10 settings.
- What is FAT32 maximum file size limit?
- How to create a secret folder in Windows 11 and 10.
- How to easily password-protect Windows Linux folders with Folder Guard.
- Force DISKPART to delete EFI system partition in Windows 11 and 10.
- How to make Windows 11 and 10 recognize a cloned hard drive again.
- How to stop Windows 11 and 10 from using thumbnail preview icons for folders.
- How to hide pictures from the Photos app in Windows 11 and 10.
- How to save Windows Spotlight photos to your computer.
- How to move the OneDrive folder to an encrypted drive.
- Windows 10 fails to upgrade? Here is how to fix it.
- How to stop Microsoft Edge from opening PDF files.
- Preventing installations of specific programs with Folder Guard.
- Folder Guard licensing explained.
- Speed up the updates of the network folders.
- Make your Windows laptop work as a Wi-Fi access point.
- How to stop automatic Windows Update in Windows 10 and 11.
- [SOLVED] Windows cannot connect to the printer. Access is denied.
- Migrating encrypted data from TrueCrypt to USBCrypt.
- “The Microsoft account service is unavailable right now. Try again later.”
- Using DiffMerge as the external tool of AB Commander to compare plain text files.
- How to repair the icon cache and/or thumbnail cache in Windows 11 and 10.
- Transferring images between your PC and an Android device: Part 2.
- Transferring images between your PC and an Android device: Part 1.
- Case study: Using SoftDetective to suppress Corel Guide sign-in prompt.
- Using junction points to change the iTunes backup folder location.
- How to tell if my Windows computer is 32- or 64-bit?
- How do I stop Windows from rearranging my desktop icons?
- Organize your photo library with the Rename tool of AB Commander.
- Windows does not offer the NTFS format option? Here is how to bring it back.
- How to encrypt Firefox profile, bookmarks, and cookies.
- Restarting Windows 11, 10, and Windows 8 in the safe mode.
- Integrating AB Commander with Universal Viewer.
- How to delete a protected EFI system partition with Windows 11,10, 8, or 7.
- Using Folder Guard to protect from the social engineering attacks.
- How to erase Windows login password if you forget it.
- How to unhide a folder hidden with Folder Guard.
- How to repair Windows desktop icons with AB Commander.
- Slow network in Windows 7 Virtual PC? Speed it up!
- How to show drive letters first in AB Commander and Windows Explorer.
- What is my IP address?
- Why can’t I copy large files over 4GB to my USB flash drive or SD card?
- Test the strength of your password with USBCrypt.
- How to set up an external text editor for AB Commander.
- How to restrict Internet Explorer from downloading programs from the Internet.
- Personal vs business license for USBCrypt.
- Use Folder Guard to restrict access to Control Panel.
- Compare MySecretFolder and Folder Guard.
- Hide folders and make files invisible with Folder Guard.
- WINEXIT vs ActiveExit: automatically log off users from Windows.
- How to protect folder with password in Windows 11 and 10.
- How to restrict access and lock external drives with Folder Guard.
- How to password-protect Dropbox folder with USBCrypt.
- How to set up Folder Guard to stop downloading from the Internet.
- Is (Wipe the content) the same as (Secure Delete)?
- How to encrypt and protect the system C: drive with USBCrypt.
- Make it easier to return your lost encrypted drive.
- USBCrypt for users of Microsoft Office.
- How to start programs elevated from a batch file.
- How to make elevated programs recognize network drives.
- How to disable or enable hibernation.
- Using names and labels to organize USBCrypt drives.
- How to password-protect a USB flash drive.
- Always have a backup of your important files.
 Stand with Ukraine

